Bouncing Ball Tutorial
To learn how to write games for µGame, it’s best to start with a practical example. We will try to make a simple demo, showing on the screen a moving ball, bouncing off the screen edges. It’s very simple, but demonstrates some of the most important concepts that you will need to know.
Clean Slate
We don’t want anything to interfere in our tutorial, so let’s start with making sure that everybody is starting with the same state. There are probably some files on your µGame right now — perhaps a demo program it came with, perhaps the remnants of earlier experimentation. Please copy those files somewhere safe on your computer, and then delete all the files from the CIRCUITPY drive.
The Main File
Now, create a file called main.py, and open it in a text editor. This is going to be where we put all the code. Later on, with more complex projects, you will be probably using multiple Python files, but for now everything will go into main.py.
Please also open a serial console, as described in the usage manual, so that you can see all the messages and errors.
Now type the first few lines of the program, and save it:
import ugame
import stage
Once you hit “save”, you should see in the console that the board restarts and runs your program. For now there should be no effect of running it, it just imports the two libraries that we are going to use later. If you made a mistake somewhere, however, you will see an error printed on the console, telling you the line number where the error is. Correct it and save again, and the board will restart again and run your code.
You won’t find the Python files for those two libraries on your device, because they are included in the firmware directly. The first one, ugame, gives you access to all the hardware of your device: the display, the buttons, the audio output, the battery voltage, etc. The second one, stage, is a very basic game library, giving you an easy way to draw tiled maps and sprites on the screen. There is complete documentation for that library, if you are curious..
Banks
All the graphics used in µGame is organized into so-called “banks”: sets of 16 images, 16×16 pixels each, with a 16-color palette. You probably noticed that we like the number 16 — it really simplifies a lot of things.
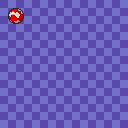
For our bouncing ball demo, we are only going to use a single bank, because we only need 5 images: one for the background, and four for the animated ball. The bank we are going to use looks like this:

Now please right-click on that image, select “save as”, and save it onto your CIRCUITPY disk as ball.bmp, next to the main.py file. This way we will be able to load it into memory and use in our demo.
Note
The code reading the graphics files on µGame is very simple, and so the files need to be in a very specific format. It has to be a 16-color BMP file, 16 pixels wide and 256 pixels high. Make sure that your graphics program can save such files.
If you look at the image, you will notice that it has all the 16 square images stacked together one on top of the other, and that it uses a bright magenta color for the background. That magenta color (100% red, 0% green, 100% blue) is going to always be considered a “transparent” color. This is useful when we want our image of the ball to be round, and not square.
Now let’s add to our program some code for loading that graphics into memory:
import ugame
import stage

bank = stage.Bank.from_bmp16("ball.bmp")
When you save this, nothing will be displayed, but the file will be read and prepared to be used by our program. If there is any problem with the file, you will get an error on the console.
Grids
Now that we have our graphics loaded into memory, we can display it. There are several ways we can do this, but in this case we are going to use a Grid. What is a grid? It’s a map of square tiles, each of them 16×16, all coming from the same bank. Each square of the map can display a different tile from the bank, so you can use them to display levels. Let’s create a grid using our bank:
import ugame
import stage

bank = stage.Bank.from_bmp16("ball.bmp")
background = stage.Grid(bank)
By default a grid is the same size as the screen, so 16×16 squares. You can also specify width and height, to create a grid of a different size, but for now this is enough for us. Now, how do you display it on the screen?
Stage
To actually display anything, we will need a Stage object — that represents the whole screen of your game, with all the things that need to be displayed. Those things are organized into layers — starting from the ones closest to you, and going deeper. The order of layers is important, because they will cover each other. For now, we only have one thing to be displayed, our grid, so we only need one layer:
import ugame
import stage

bank = stage.Bank.from_bmp16("ball.bmp")
background = stage.Grid(bank)
game = stage.Stage(ugame.display, 12)
game.layers = [background]
game.render_block()
When you save this code, you will finally see something on the screen: a blue checkered background. That is because a new grid is by default displaying the first tile in the bank, and that is the blue tile, repeated 128 times.

The command that actually displayed it on the screen is render_block. You are going to call it in your program at least once, at the beginning. Without any parameters it will simply redraw the whole screen. You can also use this and other methods to only redraw parts of the screen — and we are going to do that later on, as it is much faster than redrawing the whole screen every time. But you need to draw it all at the beginning, so there we go.
Note
You are probably wondering what that number 12 is doing there. We will need it later, when we are actually doing any animations: this is the number of frames per second (FPS) that our game is going to run at. You might be used to playing games where you have 300 fps or more, but on this kind of hardware, 12 or 24 fps is pretty standard.
Sprite
Let’s display our ball now. We could create another grid, but instead let’s try something new: a Sprite. Sprites are 16x16 images representing things in your game such as the player character, the monsters, the items, the bullets, the explosions, etc. Unlike grids, they can only display one image at a time, but you can change that image and move it around the screen easily. So let’s modify our code to include a sprite:
import ugame
import stage

bank = stage.Bank.from_bmp16("ball.bmp")
background = stage.Grid(bank)
ball = stage.Sprite(bank, 1, 8, 8)
game = stage.Stage(ugame.display, 12)
game.layers = [ball, background]
game.render_block()
The parameters you have to pass are the bank, the image from that bank, and the x and y coordinates of the sprite. You can also see that we added our sprite to the layers. This is important, otherwise it wouldn’t be displayed. It also has to be in the list before the background, otherwise it wouldn’t be visible. When you save this code, you should see our ball on the screen.
Animations
Now let’s make that ball animated. The simplest way to do it is by spinning it — that is, making the sprite display a different image every frame. We can do that by adding a loop to our program:
import ugame
import stage

bank = stage.Bank.from_bmp16("ball.bmp")
background = stage.Grid(bank)
ball = stage.Sprite(bank, 1, 8, 8)
game = stage.Stage(ugame.display, 12)
game.layers = [ball, background]
game.render_block()

while True:
    ball.set_frame(ball.frame % 4 + 1)
    game.render_sprites([ball])
    game.tick()
If you are familiar with Python, you will know that while True: makes things be repeated over and over again infinitely. Now, set_frame will change the frame displayed by our sprite — we want it to go 1, 2, 3, 4, 1, 2, 3, 4, … because we only have 4 frames of animation of the ball. The modulo operator % takes care of that. Next, we call render_sprites to re-draw our sprite on the screen, and then tick() will wait for the next frame, making sure there are exactly 12 of them per second, as we specified when we created the stage.
Movement
Now let’s try to move the ball from where it spins, and make it travel across the screen. To do that, we can use the move method of the sprite, just like we changed its frame:
import ugame
import stage

bank = stage.Bank.from_bmp16("ball.bmp")
background = stage.Grid(bank)
ball = stage.Sprite(bank, 1, 8, 8)
game = stage.Stage(ugame.display, 12)
game.layers = [ball, background]
game.render_block()

dx = 2
while True:
    ball.update()
    ball.set_frame(ball.frame % 4 + 1)
    ball.move(ball.x + dx, ball.y)
    if not 0 < ball.x < 112:
        dx = -dx
    game.render_sprites([ball])
    game.tick()
We had to add one more complication. The update method of the sprite saves its old position in a temporary memory, so that when we call render_sprites, both the old position of the sprite and the new one can be updated. If we didn’t call it, we would have leftovers of the previous ball drawn on the screen. You can try it by commenting out that line.
Multiple Balls
Now, suppose we wanted to have more moving objects in our game. Obviously we need more sprites, and the code to move all those sprites. Putting it all in the main loop like we did so far may be a little bit too messy. So we can subclass the Sprite class, and create our dedicated sprites, with behavior included:
import ugame
import stage


class Ball(stage.Sprite):
    def __init__(self, x, y):
        super().__init__(bank, 1, x, y)
        self.dx = 2
        self.dy = 1

    def update(self):
        super().update()
        self.set_frame(self.frame % 4 + 1)
        self.move(self.x + self.dx, self.y + self.dy)
        if not 0 < self.x < 112:
            self.dx = -self.dx
        if not 0 < self.y < 112:
            self.dy = -self.dy


bank = stage.Bank.from_bmp16("ball.bmp")
background = stage.Grid(bank)
ball1 = Ball(64, 0)
ball2 = Ball(0, 76)
ball3 = Ball(111, 64)
game = stage.Stage(ugame.display, 12)
sprites = [ball1, ball2, ball3]
game.layers = [ball1, ball2, ball3, background]
game.render_block()

while True:
    for sprite in sprites:
        sprite.update()
    game.render_sprites(sprites)
    game.tick()
Now, the __init__ method of our new class handles creating a new sprite and setting its initial parameters, and the extended update method handles the behavior. Of course you can have many different classes if you want to have different behaviors. The super() call is a way to call the original method of the Sprite class.
Text
Often you will have to display some messages for the player. Whether it is the current score count, the character’s dialogue or the traditional “game over”. You can do it by using yet another kind of layer, the Text layer:
import ugame
import stage


class Ball(stage.Sprite):
    def __init__(self, x, y):
        super().__init__(bank, 1, x, y)
        self.dx = 2
        self.dy = 1

    def update(self):
        super().update()
        self.set_frame(self.frame % 4 + 1)
        self.move(self.x + self.dx, self.y + self.dy)
        if not 0 < self.x < 112:
            self.dx = -self.dx
        if not 0 < self.y < 112:
            self.dy = -self.dy


bank = stage.Bank.from_bmp16("ball.bmp")
background = stage.Grid(bank)
text = stage.Text(12, 1)
text.move(16, 60)
text.text("Hello world!")
ball1 = Ball(64, 0)
ball2 = Ball(0, 76)
ball3 = Ball(111, 64)
game = stage.Stage(ugame.display, 12)
sprites = [ball1, ball2, ball3]
game.layers = [text, ball1, ball2, ball3, background]
game.render_block()

while True:
    for sprite in sprites:
        sprite.update()
    game.render_sprites(sprites)
    game.tick()
Conclusion
This is as far as we are going to go with this simple demo. Hopefully it will help you on your journey to becoming an experienced game developer!